
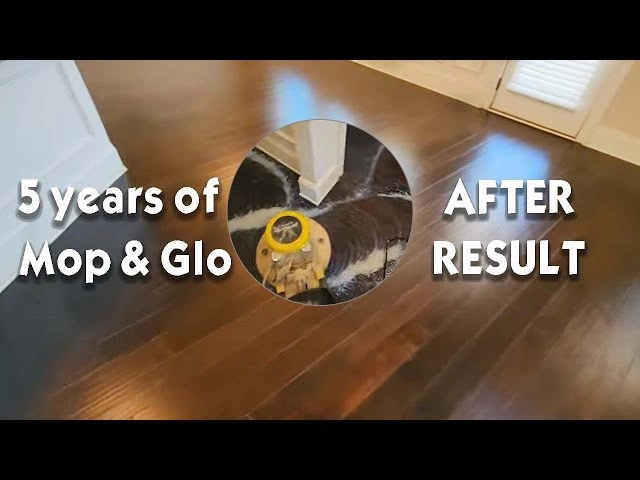
Remove Mop & Glo by applying a solution of 1 cup ammonia and 1/2 cup laundry detergent mixed in 1 gallon of hot water. Alternatively, use a 1:3 ratio of white vinegar to water. Let the solution sit for 5–10 minutes, scrub with a soft brush, then mop with clean water.
Understanding Mop and Glo Buildup and What You’ll Need
Why Mop and Glo Creates Problems
Mop and Glo leaves behind a thin polymer coating designed to add shine and protection to floors. This acrylic layer produces the signature glossy “wet look” that initially seems appealing. When used properly, the residue remains minimal. However, improper overuse or inadequate removal during cleaning leads to a cloudy haze developing.
The real issue starts when you apply more product than needed or let it dry completely without wiping it off. Consequently, visible residue develops and accumulates with each application. This acrylic layer becomes sticky and porous, acting as a magnet for dirt, dust, and grime. You’re essentially creating a sandwich: a layer of polish, a layer of dirt, then another layer of polish on top. The more you clean with Mop and Glo, the thicker this dirt-trapping layer becomes.
Over time, this waxy buildup quickly scuffs, yellows, and dulls. The surface loses its original shine and takes on a hazy, unsightly film. On porous materials like grout, the sticky residue seeps into tiny pores, causing permanent-looking discoloration. Traditional mopping won’t remove this buildup. In fact, it often makes the problem worse by spreading contaminated water and adding more chemical residue instead of lifting it away.
Essential Supplies and Tools
Before starting the removal process, gather these items:
- Plastic scraper or putty knife for gently lifting hardened residue
- Microfiber mop or soft cloths for applying solutions without scratching
- Floor stripper products specifically formulated to dissolve acrylic buildup
- Ammonia or white vinegar for breaking down polymer layers
- Buckets for clean and dirty water separation
- Soft scrub brush for textured surfaces and grout lines
- Absorbent cloths for drying and final touch-ups
Safety Precautions Before You Start
Floor strippers contain chemicals that can be corrosive. Some products are strong enough to eat through paper or styrofoam cups. Wear chemical-resistant gloves throughout the entire process, as stripper can cause skin irritation and pain if it gets under fingernails.
Safety goggles or a face shield are non-negotiable. Stripper can splash up during scraping or application, and eye contact causes serious harm. Wear non-slip footwear with good tread to prevent falls on wet, slippery surfaces.
Open windows and turn on fans to maintain proper ventilation during use and drying. Never mix Mop and Glo removal products with other cleaners, acids, or ammonia unless specifically instructed. Place wet floor signs until surfaces are completely dry.
How to Remove Mop and Glo from Wood Floors
Method 1: Vinegar Solution for Light Buildup
Pour 1/2 cup of white vinegar into one gallon of hot water. The water should be cool enough to submerge your hands comfortably. Vinegar’s acidity brings up the waxy residue from Mop and Glo.
Add several drops of lemon, orange, or clove essential oils. These oils subdue the harsh vinegar smell that can overwhelm your space during cleaning.
Method 2: Ammonia Solution for Heavy Buildup
Mix one cup of ammonia with a quarter cup of floor cleaner and half a gallon of water. Alternatively, use one cup of ammonia per gallon of warm water for stubborn buildup. Ammonia has a strong odor, so ensure proper ventilation. Never mix ammonia with bleach, as this creates a toxic chemical reaction.
Ammonia strips polyurethane or wax finish effectively. For this reason, it works well on heavy Mop and Glo accumulation that vinegar cannot handle.
Step-by-Step Removal Process
Vacuum the floor to remove excess dust and debris. Dip a microfiber cloth in your chosen solution and wring it out thoroughly. Keep the amount of solution minimal to prevent the subfloor from getting wet and the wood from warping.
Start scrubbing from the farthest corner until you reach the doorway. Work in small, manageable sections. Apply the solution to one area and let it sit for five to ten minutes. The vinegar or ammonia needs time to break through the residue.
Rinse sections with clean microfiber cloths after the solution sits. Rinse thoroughly to remove all residue.
Drying and Inspecting Your Wood Floor
After rinsing, dry the floor completely with absorbent cloths. Inspect each section for remaining haze or sticky spots. If buildup persists, repeat the process on affected areas.
How to Remove Mop and Glo from Tile Floors
Preparing Your Tile Floor
Ceramic and porcelain tiles withstand more aggressive cleaning than wood surfaces. Vacuum or sweep the entire floor to remove loose dirt and debris before applying any solution. Pay attention to corners and areas along baseboards where dust accumulates. This prevents dirt from spreading during the wet cleaning process.
Open windows and turn on exhaust fans before mixing your cleaning solution. Ammonia produces strong fumes that require adequate air circulation. Place a wet floor sign near your work area to prevent slips.
Ammonia and Cleaner Mixture Method
Mix one cup of ammonia with a quarter cup of all-purpose floor cleaner (without bleach) and half a gallon of water. For heavily soiled areas with years of buildup, use one cup of ammonia per gallon of hot water instead. This stronger concentration removes ground-in dirt, grime, and old wax more effectively.
The ammonia breaks down the acrylic polymer in Mop and Glo, dissolving the sticky film that traps dirt. Tile surfaces can handle this solution without damage, making it more effective than the vinegar method used on wood floors.
Scrubbing and Rinsing Technique
Apply the ammonia solution to a small section of floor. Let it sit for a few minutes to penetrate the buildup. Use a deck brush or scrub brush to work the solution into the tile surface. Scrub in circular motions, applying firm pressure on areas with thick residue.
Work in four-foot sections at a time. Once you finish scrubbing one area, rinse it thoroughly with plain water before moving to the next section. Use a clean mop dampened with fresh water to remove all ammonia residue. Wipe the floor dry with absorbent cloths. Inspect the tiles for remaining haze. Repeat the process on stubborn spots until the original tile surface appears clean and residue-free.
How to Remove Mop and Glo from Laminate Floors
Why Laminate Requires Special Care
Laminate floors cannot be sanded and refinished like wood floors. Damage means replacement, making prevention critical. The material is not moisture-proof. Excessive water exposure causes warping and swelling. On account of these vulnerabilities, laminate demands gentler removal methods than tile or sealed wood surfaces.
Acetone-Based Removal Method
Use 100% pure acetone to remove the film. Purchase it from hardware stores or beauty supply outlets. Open all windows and doors before starting. Acetone dissolves oily films effectively but is extremely flammable and causes eye and throat irritation. Pour acetone in a spray bottle, apply liberally, and clean with scrap rags. Work the solution with plenty of effort until the film lifts. Avoid harsh brushes. Use a non-stick scrubber sponge or #0000 steel wool for stubborn spots.
Using Commercial Floor Strippers
Floor strippers designed for VCT wax work on acrylic buildup. Test a small area with 50/50 Mr. Clean and hot water first. The solution might go hazy initially from heat. Scrub for 30 to 60 seconds, wipe dry, then inspect after an hour.
Avoiding Water Damage on Laminate
Never soak laminate floors. Water seeping into seams results in warping or swelling. Mist cleaner lightly and work in sections. Dry immediately after cleaning.
Conclusion
You now have effective methods to tackle Mop and Glo buildup on any floor type. Whether you’re using vinegar on wood, ammonia on tile, or acetone on laminate, the key is patience and proper technique. Work in small sections, avoid excess moisture, and always ventilate your space. Above all, test solutions in hidden areas first to prevent damage. Your floors will regain their original shine with consistent effort and the right approach.