Scratches After Mopping Cleaning Checklist
Most scratches after mopping are caused by grit, residue, or the wrong cleaning method rather than permanent damage. Use a floor-safe checklist to identify the mark, clean it correctly, and call a professional if the damage does not lift. Related: floor scratch marks. Related: mopping residue. Related: microfiber mop. Related: neutral pH cleaner.
When a floor looks scratched after mopping, the problem is not always permanent damage. In many homes, the marks are residue, grit, or finish dulling that can be fixed with the right cleaning checklist. Related: scratches after mopping.
- Identify first: Scratches, haze, and streaks can look similar but need different fixes.
- Remove grit: Dry-sweep or vacuum before re-mopping to avoid dragging debris.
- Match the floor: Hardwood, vinyl, tile, laminate, and stone each need different care.
- Use safer tools: Microfiber pads and neutral-pH cleaners are usually the best starting point.
- Escalate wisely: Deep grooves, swelling, or coating failure need professional evaluation.
Why Scratches Appear After Mopping: What the Checklist Is Trying to Fix
A good scratches after mopping cleaning checklist starts with diagnosis, not more scrubbing. The goal is to separate true surface damage from cleaning mistakes that only look like scratches.
Residue, grit, and improper mop pressure as the most common causes
Fine sand, pet litter, and other debris can act like sandpaper when dragged across the floor. Dirty mop water, a loaded mop head, or too much pressure can spread that grit instead of lifting it.
In other cases, the “scratch” is actually cleaner film, soap haze, or a dull patch created by repeated passes with a heavy hand. If you want a broader cleaning reference for floor upkeep, the weekly mopping cleaning checklist can help you compare routine care with problem-solving care.
How to tell true scratches from streaks, haze, or dulling
True scratches usually catch the light at an angle and may feel scored with a fingernail. Streaks and haze tend to look cloudy, wipe partially away, or change when the floor dries.
If the mark disappears with a clean damp microfiber cloth, it was likely residue rather than damage. If it stays visible after gentle cleaning, you may be dealing with finish wear, etching, or a deeper issue that needs more than mopping.
First Response Cleaning Checklist for Scratches After Mopping
The first pass matters because repeated cleaning with the wrong tools can make the problem worse. Use this checklist before you assume the floor is ruined.

- Stop using the same mop and bucket until the issue is identified.
- Remove loose grit with a dry sweep or vacuum.
- Test a hidden area with clean water and a fresh microfiber pad.
- Check whether the surface feels sticky, cloudy, rough, or visibly scored.
Stop using the same mop and bucket until the issue is identified
A dirty mop head can keep redistributing grit, cleaner film, and lifted debris. If the floor started looking worse after the first pass, pause before you repeat the same method.
Dry-sweep or vacuum to remove abrasive debris before re-cleaning
Dry removal is the safest way to handle loose particles. A soft-bristle vacuum or dust mop can pick up grit from corners, seams, and entry points where scratches often begin.
Cleaning Tip
Work from the farthest corner toward the exit so you do not walk grit back across the floor.
Test a small hidden area with clean water and a fresh microfiber pad
Use a small, concealed spot first, especially on delicate finishes. If the mark lifts with plain water and a fresh pad, the issue may be residue rather than scratching.
Check whether the floor feels sticky, cloudy, rough, or visibly scored
Sticky or cloudy floors often point to soap film or rinse residue. Rough spots, on the other hand, may indicate actual surface wear, embedded grit, or damage to the finish layer.
Floor-Type Compatibility: What to Do for Each Surface
Not every floor reacts the same way to water, cleaner, or pressure. Matching the method to the material is one of the easiest ways to avoid scratch-like marks.

Hardwood and engineered wood: finish-safe cleaning and moisture limits
Wood floors need minimal moisture and a finish-safe cleaner, if any cleaner is needed at all. Excess water can swell seams, cloud the finish, or leave marks that look like abrasion.
For wood, use a barely damp microfiber pad and avoid soaking the boards. If the surface looks damaged after mopping, ask a flooring professional before using waxes, oils, or restorative products that may complicate the finish.
LVP and vinyl: avoiding chemical film and textured-surface trapping
Luxury vinyl plank and sheet vinyl are usually easier to clean, but textured surfaces can trap residue in grooves. Strong cleaners may also leave a film that catches light and looks like scratching.
If you are deciding whether a floor is safe for a stronger product, this guide pairs well with can you use scratches after mopping for a more careful compatibility check.
Tile and grout: dealing with grit in joints and mineral residue
Tile itself may resist scratching, but grit often settles into grout lines and edges. Hard water or leftover cleaner can also leave mineral haze that mimics scuffs on glossy tile.
Rinse passes matter here. If the floor still looks dull after cleaning, the issue may be residue in the grout or a product buildup rather than a scratched tile surface.
Laminate: why excess water and harsh cleaners can mimic scratching
Laminate can swell, haze, or lose sheen when exposed to too much moisture. That change can look like fine scratches, especially under bright light. [Source: This Old House]
Use only a lightly damp mop and avoid abrasive pads. If marks wipe away while the floor is dry, the issue is probably film or moisture distortion, not permanent scoring.
Stone and sealed concrete: pH-safe products and etching concerns
Natural stone and some sealed concrete floors need pH-safe cleaners. Acidic or harsh products can etch the surface, and etching is often mistaken for scratching because it changes the sheen.
Floor Care Note
With stone, the finish and sealer matter as much as the base material. When in doubt, check the product label and the flooring maker’s care guidance before cleaning again.
Cleaning Products and Tools to Use Instead of Scratch-Causing Methods
The best tools lift soil without dragging it around. In most cases, softer and cleaner is safer than stronger and rougher.

Microfiber mop pads versus string mops, sponge mops, and abrasive pads
Microfiber pads are usually the safest choice because they trap fine particles instead of pushing them across the floor. String mops and sponge mops can hold more soil if they are not rinsed well, and abrasive pads can damage delicate finishes.
- Microfiber pads on most finished floors
- Soft dust mops for pre-cleaning
- Fresh pads when re-checking a mark
- Abrasive scrub pads
- Overloaded string mops
- Old pads that hold grit
Neutral-pH cleaners, distilled water, and floor-specific solutions
Neutral-pH cleaners are often the safest starting point for sealed floors. Distilled water can help in areas with hard water, where mineral spots may be mistaken for scratches.
Always follow the floor type first and the cleaner second. A product that works on tile may be too harsh for hardwood or laminate.
Soft-bristle vacuums and dust mops for pre-cleaning
Pre-cleaning is not optional when you are dealing with scratch-like marks. A soft-bristle vacuum or dust mop helps remove the debris that wet cleaning would otherwise drag across the surface.
When a rinse pass is better than adding more cleaner
If the floor feels sticky or looks cloudy, more cleaner usually makes things worse. A clean-water rinse pass with a fresh microfiber pad can remove leftover product without adding new residue.
Do not keep layering cleaner on top of film, haze, or grit. That can turn a small cleaning issue into a larger dulling problem.
Common Mopping Mistakes That Leave Scratch-Like Marks
Many “scratches after mopping” are really the result of avoidable habits. These mistakes are common in busy homes because they save time in the moment but create extra work later.
Using dirty water or reusing a loaded mop head
Once the water turns gray, it is no longer helping much. Reusing a loaded mop head spreads the same grit and cleaner residue over and over.
Skipping dry debris removal before wet cleaning
Wet mopping over sand, crumbs, or pet litter is one of the fastest ways to create fine marks. Dry removal should always come first, especially near doors and feeding areas.
Using too much cleaner and leaving behind film
More product does not mean more clean. Too much solution can leave a film that dulls shine and makes the floor look scratched under natural light.
Scrubbing with the wrong pad on delicate finishes
Some finishes cannot handle aggressive scrubbing. A pad that is fine on tile may be too harsh for hardwood, laminate, or polished stone.
Ignoring sand, pet litter, or shoe grit at entry points
Entryways collect the debris that causes most floor wear. If the same problem keeps returning, the cleaning routine may be fine but the prevention step is missing.
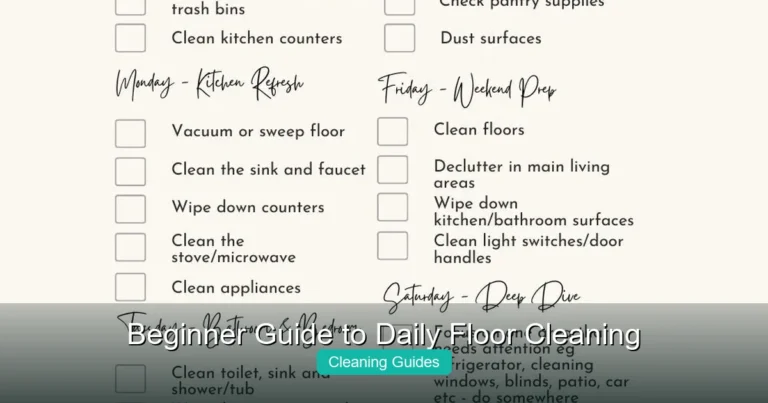
For homes with more foot traffic, the daily floor cleaning checklist can help you keep grit from building up between deeper cleans.
Practical Examples: How the Checklist Changes by Situation
Different floors and messes need different responses. The checklist stays the same in principle, but the order and product choice change by situation. [Source: Family Handyman]
After a muddy entryway spill on vinyl plank flooring
Start with dry removal, then use a microfiber pad and a mild cleaner if needed. If the marks look like scratches after drying, check for trapped grit in the plank texture before re-mopping.
After polishing haze appears on hardwood after a deep clean
Stop using polish or wax-style products until you know the finish type. A haze on hardwood is often leftover product, not damage, and it may need a light rinse or a finish-safe cleaner rather than more polishing.
After grout dust or renovation debris gets dragged across tile
Renovation dust is especially abrasive, so vacuum first and rinse well. If the tile is glossy, leftover mineral or construction residue can leave drag marks that resemble scratching.
After a laminate floor looks scratched but the marks wipe away
If the marks disappear with a clean damp cloth, the laminate is probably showing film or streaking. Avoid heavy water and harsh scrubbing, since those can create the same look again.
When Scratches Need a Flooring Professional Instead of More Cleaning
Cleaning can solve a lot, but it cannot repair every kind of damage. Knowing when to stop is just as important as knowing how to clean.
Deep grooves, finish loss, swelling, or discoloration that will not lift
If you can feel grooves with a fingernail, or if the floor is swollen, discolored, or permanently dull, more mopping will not fix it. Those signs often point to finish failure or structural damage.
Signs of coating failure, etching, or water damage beneath the surface
White spots, cloudy patches, soft boards, or recurring dull areas may indicate a deeper problem. Stone etching and water damage can look similar to scratches, but they need different repairs.
Repair versus replacement: what professionals typically assess first
A flooring professional usually looks at the surface finish, the depth of the damage, and whether the issue is localized or widespread. That assessment helps determine whether spot repair, refinishing, or replacement is the realistic next step.
Cost, Prevention, and Final Recap for a Scratch-Free Mopping Routine
It is usually cheaper to fix a cleaning method than to repair a damaged floor. The best long-term approach is to prevent grit, residue, and excess moisture from becoming repeat problems.
Cleaning fix costs versus repair costs for wood, vinyl, tile, and laminate
Most cleaning fixes only require better tools, a fresh pad, or a floor-safe cleaner refill. Repairs, on the other hand, can involve patching, refinishing, or replacing sections, and those decisions vary by material and damage depth.
Cost Note
When the issue is only residue or haze, the cost is usually limited to replacement pads and the right cleaner. If the floor is scratched through the finish, the repair cost can rise quickly, especially on wood or stone.
Simple prevention habits to keep scratches from returning
Keep a dust mop or vacuum routine near entryways, rinse or replace mop pads often, and use the least aggressive product that gets the floor clean. Dry debris removal before mopping is one of the simplest habits with the biggest payoff.
Recap of the checklist: identify, clean correctly, match the floor, and escalate when needed
The safest response to scratches after mopping is to identify the mark, remove grit, test a small area, and match the method to the floor type. If the mark does not lift or the surface is damaged, contact a flooring professional before trying harsher fixes.
Frequently Asked Questions
No. Many marks are residue, haze, or grit that can be removed with the right cleaning method. If the mark stays visible after gentle cleaning, it may be a true scratch or finish damage.
Stop using the same mop and bucket, then dry-sweep or vacuum the floor. Test a hidden area with clean water and a fresh microfiber pad before you clean the whole surface again.
Yes. Excess cleaner can leave a film that dulls shine and creates streaks or haze that look like scratches. A rinse pass may help more than adding extra product.
A clean microfiber mop pad is usually the safest choice for most finished floors. It traps debris better than abrasive pads and is less likely to drag grit across the surface.
Call a flooring professional if you see deep grooves, swelling, discoloration, coating failure, or marks that will not lift. Those signs can point to damage below the surface or a finish problem.
Yes. Hardwood, vinyl, laminate, tile, stone, and sealed concrete all react differently to water, cleaner, and pressure. Matching the method to the floor type is one of the best ways to avoid more damage.